A Simple Journal Recording Growing Edibles At Singapore High Rise HDB Flats. My Philosophy Is "If Keep Plants, Why Not Keep Edibles?"
17 Oct 2023: Edible Garden Update
This is how one of my 1st batch of Bayam (Green) plant looks like now. It seems to be dying. This plant is likely at the las...
Sunday, 27 August 2023
27 Aug 2023: Edible Garden Update
Sunday, 20 August 2023
Growing Potatoes
This YouTube video show that it is possible to grow potatoes using cardboard box and plastic bag as well. I have some intention to grow potatoes as I have managed to food rescue potatoes. Since it is possible to grow in plastic bag, I don't mind trying it out. Would be using the methods used in this YouTube video to prepare the potatoes before planting or potting into seedlings. Just make sure the shoots not be white as it will be weak when grown. I would likely use this guide to plant my potatoes. Looks good from planting to harvesting.
Saturday, 19 August 2023
Soluble Calcium Fertilizer In The Making
Pot Rack From Discarded Dish Drying Rack
Friday, 18 August 2023
DIY Water Soluble Calcium Fertilizer Using Eggshells and Vinegar
This is the Youtube Video on water soluable calcium fertilizer made from just egg shells and vinegar. Just need to the the proportion right.
The ingredients are egg shells, which I get often from my dad and I do keep them myself. I also grinds them into powder often for my plants but as you know, they don't break down so easily, even in powder form. As for vinegar, she uses white vinegar but I am interested to know if eco-enzyme, which is also a form of vinegar, should work as well as it is free for me. I can also buy cheap white vinegar in bulk if I need to do this often. The ratio of vinegar and egg shell powder is 10:1.
Tips:
- When mixing the two ingredients, note not to make too much as the process builds up many bubbles and may over-spill from the container. Either use a bigger container or make small portions.
- The process takes about two weeks to completely dissolve the egg shells. So use a breathable material, cloth or paper coffee strainer to cover the top. The process produces carbon dioxide so do not have a tight lid over the container.
- The completed concentrated solution needs to be diluted with ration of calcium solution with water is 30ml : 4.5L.
- Spray the diluted solution on both sides of the leaves. Apply during morning or evening to prevent heat stress.
- If too many concentrated solution, can dilute in bigger volume and use the diluted solution for adding to compost or water your plants.
Growing Chillli Plants From Seeds To Harvest
Found this YouTube video on growing chilli plants from seeds to harvest interesting and decided to put into this blog for reference. Maybe I might grow one but it is recommended to grow a few for easier pollination.
Thursday, 17 August 2023
Simple DIY Hydroponic Growing System
Just found an interesting YouTube video of growing bok choy using cheap materials to make a DIY hydroponic system. Using plastic containers or bottles for planting seeds and seedlings, plastic pipes and liquid fertillzers to grow bok choy and possible other vegetables. Some people might think it is expensive to buy a hydroponic system but being creative, it is possible to DIY one using cheap materials.
How to plant bok choy in used bottles, sow to harvest using hydroponic
An easy and cheap way to grow hydrponic bok choy mustard in used bottles from seedling to harvesting.
17 Aug 2023: Finally Kick Start My Big Compost Bin
Wednesday, 16 August 2023
Tips For Growing Spinach From YouTube Videos
- Interesting facts is that spinach contains vitamin A, Vitamin C, vitamin K, magnesium, manganese, iron, folates and protein.
- It is a quick crop as it takes a maximum of 6 weeks to be ready for harvest.
- Spinach needs to be harvested before flowering.
- You can harvest spinach anytime and once wrapped with kitchen towel, it can be keep in fridge for 2 weeks.
- Spinach is a easy to grow vegetable but requires full sun to grow well.
- Her method of sowing the seeds is interesting. She prepared the soil, sow the seeds around the soil, scratch the seeds in, firm it down and water them.
- Germinate better in cooler temperature, 18 - 21 degrees.
- Seed priming can be soaked overnight in water or compost liquid, before planting.
- Leaves need good airflow and leaves be able to dry off.
- Spinach requires more nitrogen and if leaves becomes yellow, can add more fertilizer to add more nitrogen.
- Spinach likes sandy loamy soil with lots of organic matter. Take a bunch of soil and squeeze it. If it forms a ball and breaks up easy, then is sandy loamy soil.
- Can add up to 30% compost to soil for spinach.
- Spinach prefers moist soil and depth about 4 inches(10.12cm).
- Plant seeds in 3-4 seeds clumps with every 3-4 inches apart or sow in rows of 3-5 seeds per inch and rows within 4 inches apart. Do not plant the seeds too deep into the soil, just cover the seeds will do.
- Successing planning to provide continuous supply of spinach by starting a new bed of spinach every 3 weeks.
- Spinach requires 6-8 hours of sunlight or artifical light to grow well. Spinach prefer morning lights and shade in the afternoon sun.
- Can harvest every week as long as the plant is producing.
- When harvesting spinach leaves, do leave a bit of leave stem so to prevent any disease from spreading to the stem.
- To counter powdering mildew, use half a litre of milk to 1 litre of water and spray on the plants.
- Spinach prefers soil acidity between pH 6.0 - 6.7.
- Grow from seeds is better than use seedling.
Monday, 14 August 2023
14 Aug 2023: Edible Garden Update
| My 1st Batch With 2nd Batch Bayam In Medium Long Pot |
| My 2nd Batch Bayam In Small Long Pots |
Holes Drilling Time
I have finally decided to drill holes (6mm size) into the IKEA FNISS Waste bin, red, 10L and the Redmart red plastic container. The size of the holes are based on big enough for airflow but not too big to let the completed compost fall out.
I decided to drill 5 holes at the bottom of the IKEA waste bin and 4 sets of holes almost to the top of the bin. I tried to drill into another red bin but it broken at the base so I have to throw it away. I also changed the red plastic lid to a circular metal plate with holes. There are many bigger holes so it should provide more airflow. However, during the next day, I noticed ants and fruit flies at my compost bin. Well, I am fine with fruit flies but not for ants.
| My First IKEA 10L Red Compost Bin |
I also drilled holes into the Redmart red plastic container with about 2 inch intervals. There are no holes at the bottom of the container as I am going to stack more containers so with holes at the bottom, it will make the other containers wet with liquid from the composting materials.
| My Redmart Red Plastic Container With Holes Drilled On All Sides Except The Bottom |
Sunday, 13 August 2023
DIY Stackable Compost Bin
Since I do not have enough space outside my HDB flat, mainly corridor or stairways, to increase compost bin capacity, meaning adding more compost bins, I decided to think of DIY stackable compost bin design for my needs.
I found a worthwhile Youtube video on this:
The design for the stackable compost bin is the closest of what I was thinking of using. This design just drills holes within 2 inches away from each other and only at the sides and top. No holes are drilled at the bottom of the bin. Even though there might be liquid coming out from the bins, that is another problem I need to solve but at least it gives me a head-start.![]() |
| Source: Alibaba.com |
| My Redmart Red Container With Lid |
Wednesday, 9 August 2023
My Edible Garden Transplanting Complete! - 9 Aug 2023
My Way Of Composting - Trial And Error Way
| Source: Composting 101(thistle.co) |
- Carbon to Nitrogen ratio (30:1) is more accurate compared to 2 parts brown and 1 part green. I think I would just go by gut feel or whatever I an find.
- Whatever browns and greens you throw into compost will eventually be decomposed and become compost. Even meat and cooked food(This may only applies with compost bins on ground soil, not cement floor). Is whether you can wait or not.
- Compost requires Carbon(Browns), Nitrogen(Greens), Air and Water. Any missing component will slow down or stop decomposition.
- Ideally, base of compost have a thick layer of browns as base. Add greens and cover with browns. Can compact the browns and green to have more space for more. If excessive liquid is supposed to leak out from the bottom.
- The browns and greens need to stay moist, not wet. Best to have holes to release excessive liquid to prevent too much moisture and becomes smelly.
- Rain water is best to moist the compost materials.
- Can add a little bit of citrus fruit peels like oranges and lime. Too acidic prevents decomposition.
- Use a variety of materials to provide different nutrients such as banana peels for potassium, neem leaves for antibacterial effects.
9 Aug 2023: Edible Garden Update
Meal Time - Stir- Fry Chinese Spinach And Cabbage With Oyster Sauce
Tuesday, 8 August 2023
Time To Add Booster To My Edilbles - Fertilizer
Monday, 7 August 2023
Composting My Kitchen Waste
Actually I have been burying my kitchen waste into bins with old garden soil that I saved after recycling them from old pots. Reusing the used soil but adding kitchen waste to provide the natural fertiliser, saves cost of buying fertilizer and soil and recycle kitchen waste. I noticed that these garden soil cannot be used direct for gardening as these garden soil seems to harm the roots of newly planted plants so I have to leave them out to dry or sun for at least a week or more before using them as garden soil.
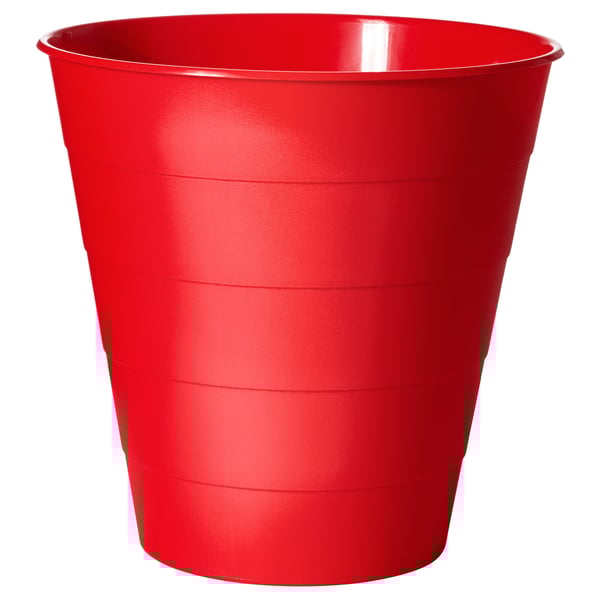
I decided to start composting. Since I am using soilless potting soil for my edibles, I prefer to use compost to add to my edibles pot. I do not have any proper equipment right now, so I use a IKEA FNISS Waste bin, red, 10L and a red lid as a starting point since I have 3 such bins available. I did not make any holes at the bottom of the bin since I have not decided whether this will be my final setup.
![]() |
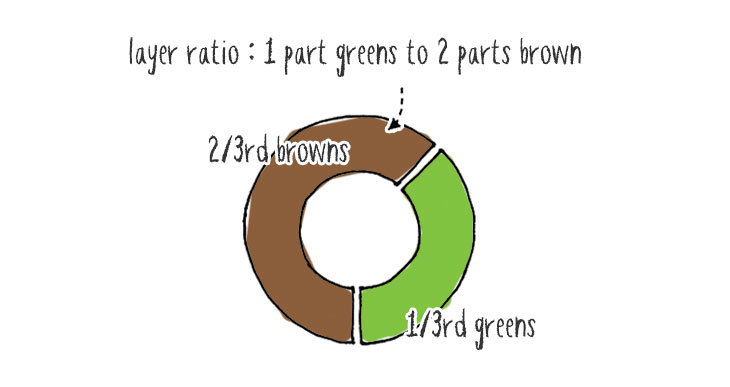
| Source: https://helpmecompost.com/compost/basics/brown-to-green-compost-ratio/ |
Composting includes a balanced "browns mix" and "greens mix." Here's what greens and browns mean:
- Greens are materials that are rich in nitrogen or protein. They are also the items that tend to heat a compost pile up because they help the microorganisms in the pile grow and multiply quickly.
- Browns are carbon or carbohydrate-rich materials. The main job of browns in a compost pile is to be food sources for all of the lovely soil-dwelling organisms that will work with the microbes to break down the contents of your compost pile. Also, brown materials help to add bulk and help allow air to filter through the pile.
Browns for the Compost Pile
Brown materials for composting include dry or woody plant material. In most cases, these materials are brown, or naturally turn brown. Brown items include the following:
- Fall leaves
- Pine needles
- Twigs, chipped tree branches/bark
- Straw or hay
- Sawdust
- Corn stalks
- Paper (newspaper, writing/printing paper, paper plates, napkins, and coffee filters)
- Dryer lint
- Cotton fabric
- Corrugated cardboard (without waxy/slick coatings)
Greens for the Compost Pile
Green materials for composting consist mostly of wet or recently growing materials. Green materials are usually green or come from plants that were green at some point. But, this is not always the case. Here are green items:
- Grass clippings
- Coffee grounds/tea bags
- Vegetable and fruit scraps
- Trimmings from perennial and annual plants
- Annual weeds that haven't set seed
- Eggshells
- Animal manures (cow, horse, sheep, chicken, rabbit, but not dog or cat manure)
- Seaweed
![]() |
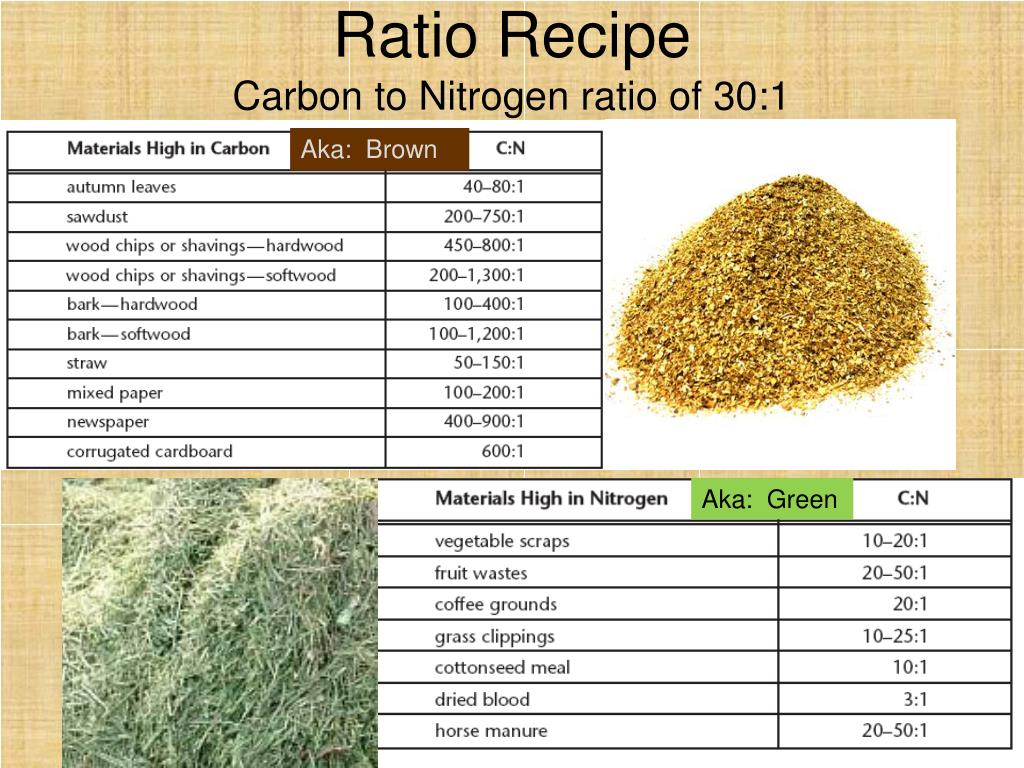
| Source: https://image.slideserve.com/855357/ratio-recipe-carbon-to-nitrogen-ratio-of-30-1-l.jpg |
| Source: https://soilseedandgarden.com/what-is-composting-and-how-does-it-work/ |
| Source: https://www.pinterest.com/pin/550565123200510718/ |
Saturday, 5 August 2023
Best Fertiliser For Leafy Vegetables - Red Ear Terrapin Poo
Seedling Arrangement, New Small Pot And More Bayam Leaves For Harvesting
How To Grow Leafy Vegetables In A Pot (NParks Video) - Useful Information To Grow Edibles
Just stumbled upon this video from NParks so I decided to write down useful information about this video and how I can improve my gardening skills to grow edibles.
Leafy vegetables have shallow roots.They grow well in soil with 10-15cm deep.
Fill the pot with edible growing mix or potting soil.
You can sow seeds directly or transplant seedling.


:max_bytes(150000):strip_icc():format(webp)/composting-greens-and-browns-2539485-01-dbe4545c40444a9c96ad4f56fe03892b.jpg)
:max_bytes(150000):strip_icc():format(webp)/composting-greens-and-browns-2539485-02-a7f571a92af94b7da094766cfbb4b065.jpg)


